
.png)
Business intelligence solutions aim at supporting better, faster and more consistent business decision-making. The success of a BI solution will also depend on the adoption, measured not only through the simple usage metrics, but also through the effectiveness of the outcomes it drives.
Luckily, through its Power Platform integration, we get to further support Power BI in driving actions more efficiently.
We aim at combining the run of multiple DAX queries against the dataset (aka semantic model since I should get used to this new term) and then informing the users about the upcoming expiring contracts.
We will need to perform some steps to achieve this:
Let's break down our need. From our semantic model we would first need a list of the contract managers which have expiring contracts in the upcoming week and then we would need a list of the respective contracts. To summarize it:
ATTENTION
Be careful when implementing such a solution for a Power BI report sitting on a workspace backed by a premium capacity, to avoid peaks on the computation monitor. Such a solution should be monitored carefully.
We are not going to go through the ins and outs of DAX, in this case we will let Power BI do most of the work for us.
I am just going to create a simple table with the User ID of the person and set a visual level filter on the upcoming expiring contracts measure. I am a big fan of using a calendar which contains also offset indexes (years, months, weeks, days), compared to relative date of the refresh, to make my life easier.
My measure will look like this, while the base measure will be just a simple count rows measure:
The basic table will look like this:

Now we will generate the table with the corresponding contract details. In the table I will need to include also the columns that I will require while running the flow, but also add the two filters on expiring contracts and User ID.

NOTE
Do not invest too much time into the formatting of dates and amounts, as the formatting will get lost when running the queries in Power Automate.
Now that we have our tables defined, it is time to let Power BI generate the DAX Queries for us. Of course we could have also written the DAX statements, but we like to be efficient, so we will get some help from the Performance Analyzer.
First, we need to start the Performance Analyzer and refresh the visuals we just created one by one. Performance analyzer can either refresh all the visuals on the report page at once, or we can choose which visual to refresh.

Once we activated the Performance Analyzer our visual will have a new header icon that we will use to initiate a visual refresh. The moment we have initiated the refresh this will be visible on the Performance Analyzer pane.

NOTE
If the visuals get renamed, this will be then visible on the Performance Analyzer pane, making it easier to identify the corresponding entry.
Now we are ready to move forward and get the generate queries. We are going to use the newly launched DAX Query View feature for this, as we like to also store those queries inside the Power BI file.

Once this is done, Power BI will take us directly to the DAX Query view, where we will rename the two tabs it generated, but we will also need to tweak the code a bit, as every matrix or table will have an automatic pagination, for a faster report page rendering.

These changes will be made for both queries. As the Evaluate function will always return a table as an output. Even for a single value, that will still be outputted as a 1 column / 1 row table. In the end our queries will look like this:
While we have used the Power BI Desktop so far, from this point onwards, we require the model to be published in the Power BI Service. Power Automate will reach out to the Power BI service to run the queries and get the output.
After the semantic model is published, we will need to get the Workspace ID and Semantic Model ID. We can get these details from the workspace by opening the semantic model object.
We are interested in the IDs corresponding to the Groups and Datasets:

After accessing the Power Automate service, we will start creating a solution. I am big fan of using Solution bundles, as it's much easier to keep everything together and having the possibilities to transfer solutions between environments much easier, or even just exporting the solution for back-up purposes.
Once the solution is created, firstly we will create two variables, that will store the Workspace and Semantic Model IDs.

When defining the variable name, keep in mind to have a certain prefix for all variables pertaining to this solution, as variables are visible at a Power Automate environment level and when working with multiple solutions, this can become tricky.

Next up we will create the Power Automate flow. In this case, the flow should run at a defined schedule, hence the type will be set as a Scheduled flow. A popup window will open and you need to define the schedule details.

NOTE
In case when you initiate the flow creation and it stays stuck on the white pop-up window, you can also create the flow outside of the solution and then bring it inside through the Add existing functionality.
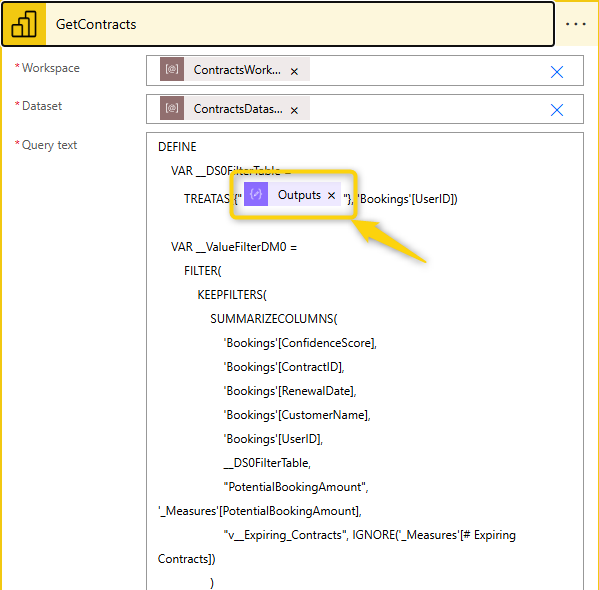
First action we are going to add is the Run a query against the dataset. We are going to use for both the Workspace and Datasets inputs the variables we created earlier. For this you must scroll down in the dropdown and choose Enter Custom Value.

After this, we will add the first query we created returning the User ID table.

NOTE
As a best practice I try to rename all steps and use the camel case format. Not having special characters will make my life a bit easier when working with expressions.
The action will output a larger JSON structure, hence, to reduce it, we will add a Compose action selecting the First table rows dynamic content from the previous step, where we ran the query.

NOTE
You can also read this article to understand how you can customize the table column names for an user friendly output.
Now we will need to perform a test run, as we need to get the exact names of columns and being able to copy them will be much easier. At the same time, it will also be good to see in case we have any errors so far.

From the run, we are interested in Output of the Compose action, as we need to get the exact column name for the User ID details.

Now that we have the user details, we need to get the contract details. For this we need to create a loop that will extract the contract details for each user (the second query we created). In order to do this, we will add an Apply to each action.

Now we will rename the action and then add the ComposeUserList output from the dynamic contents.

Next we need to get from the array the User ID of the user. For this we will need to add a new compose action. Inside the compose action we will run an expression to get User ID from the array.
Let's make it easier to understand the components of the expressions:
Now we are ready to run the final DAX query to get the contract details. For this we will add another run a query against the dataset action.
NOTE
You can also go to the first similar action and copy the action. When adding a new action, you will also see the clipboard tab containing actions or triggers that were copied previously in this session (clipboard gets reset when closing the flow editor).
In the query window of the action, we will copy the second DAX query, but we will need to replace the dummy generated User A filter value, with the action compose output of the GetUserID action. The replacement includes the double quotes.
We want to be able to attach the report to an e-mail as a CSV. For this we will add an additional Create CSV Table action, where we will select the First table rows dynamic content from the previous step.

We would like to be able to also write in the e-mail body how many contracts are expiring. For this we will add a compose step, which will count the length (number of rows) of the CSV table. We could have written this expression also directly in the send e-mail action, but having a separate step will be easier for debugging purposes.
NOTE
When writing an expression, you can avoid the need of writing the actual output details, but rather writing the base function and then selecting the output from the dynamic content. The position of the mouse courser is important when selecting the dynamic content, as it needs to be withing the brackets of the function we initiated.

The last step would be to add the send an email action. It is important to select the Office 365 Outlook action category.

Add the recipient, subject and body of the email. Keep in mind that you can also leverage any kind of dynamic content previously generated in the flow. For example, in this email body we will add the output of the compose action, where we counted the length of the CSV table.

The last step will be to add the attached. We will provide the attachment name which can be made dynamic or static, however it must include the file extension. In the attachment content section, we will provide the output of the step where we generated the CSV table.

This would be the final look of our flow:

And if we test it... let's see what we get:

